Peter Tornatore - Earl Richards (January 7, 2007) | ||
|
1. e4 c5
2. Bc4 e6 My impression is that 2. Bc4 is commonly played against the Sicilian (although not at the GM level). However, I don't see any real substance to White's immediate but easily thwarted attack on the f7 square. After 2. ... e6, the White Bishop is, as they say, chewing on granite. 3. Nf3 d6 4. Nc3 a6 With both the White Bishop and Knight attacking the b5 square, 4 ... a6 seemed prudent; it's a very Najdorf-like response. 5. 0-0 b5 I considered 5. ... Nf6 but decided to keep pushing pawns and immediately drive the White Bishop off the diagonal pointing at f7. If I had waited one tempo--that is, if 5. ... Nf6 6. a3 b5 had been played--then the White Bishop could have maintained its trajectory on the long powerful diagonal with 7. Ba2. 6. Be2 Nf6 I finally get around to moving a piece and not a pawn.  A Fritz 6 analysis declares that "Black is behind in development." However, I liked my strong pawn structure and didn't mind the delay in development for the space that I was gaining on the Queenside. 7. b3 ... So, he's going to fianchetto his dark-squared Bishop. The Fritz 6 analysis thought that 7. d3 would have been better. 7. ... Be7 8. d3 0-0 9. a3 Nc6 10. Bb2 ... And there's the anticipated fianchetto. 10. ... h6 I spent four minutes on that move. With White's Bishop moved to b2, some of the pressure was eased from the g5 square. But still I opted to protect the g5 square with 10. ... h6. I did not want his Knight there either. As it turned out, there was never any action in this game on the Kingside. 11. Qd2 Bb7 12. h3 ... Like Black, White is forcing everything to the Queenside and the center. 12. ... Qc7 I had spent three minutes trying to decide between 12 ... Qb6 and 12 ... Qc7. The former was tempting, mainly due to having my Queen on a diagonal leading to White's King; but I opted for the latter. I was a little hesitant in pushing my Queen too far forward, with White having developed his two Knights. And I was also beginning to eye the c3 pawn as a target for the future. At this point, the chessboard is quite symmetrical: our Kingsides are virtual mirrors; both of our Rook pairs are connected and exactly mirrored; every minor piece is mirrored. However, White's next move will allow the introduction of imbalances. 13. d4? ...  I see an opportunity for me. White's pawn on e4 has lost its supporting pawn with his last move. If I can drive off the Knight on c3, then my Knight can safely grab the e4 pawn. Although I had some moves later in the game that netted more material, I feel that my 13th move was my best play of the game. 13. ... b4! 14. axb4 cxb4 15. Na4 Nxe4 16. Qd3 d5 17. Ne5 Nxe5 18. dxe5  At this point, I noticed that if only White's Bishop wasn't sitting on the e2 square, there would be the possibility of skewering his Queen and Rook. I prepared for the future with: 18. ... a5 19. Bf3?? Lo and behold! White hands me exactly the skewer I wanted! 19. ... Ba6 20. Qd1 ... There wasn't anything for White but to move his Queen. Playing 20. c4 to block would not help. 20. ... Bxf1 21. Kxf1 Rfd8 I place my Rook across from White's Queen, which at the time seemed a practical move. I should have also considered that I was putting my Queen and Rook on a skewerable diagonal to which White's Bishop could conceivably move. White saw this, however. 22. Bd4 ... White shows that he had his own plans for skewering a Queen and Rook. I didn't see this move coming. As it turned out, I was able to come up with a block, but I was more lucky than foresightful. 22. ... Bc5 I had spent 6 minutes looking for the best response to White's aim to move his Bishop to b6. 23. Bxe4 Bxd4 I was relieved to get White's dark-squared Bishop off the board. With it went the skewer threats that so often have wreaked havoc on my games. 24. Qxd4 dxe4 25. Qxe4 ... White gained a pawn in that three-move flurry, but his pair of Bishops were exchanged and I own the d file now. I did not regret the pawn. 25. ... Rac8 Black prepares to go after the backward pawn on c2. 26. Rc1 Rd2 And more pressure is put on c2. 27. c4 bxc3 28. Rxc3 Qd8 That took another long think as I debated where to put my Queen. I was beginning to feel some time pressure from the need to get my first 30 moves within 90 minutes. 29. Rxc8 Qxc8 30. g3 ... White looks to create exits for his King. 30. ... Qd8 That puts my Queen and Rook on the same file, a powerful and safe place for them. Internally, I breathed a sigh of relief, having made my 30th move with three minutes to go before hitting the 90 minute limit. I felt like I had a won game now. I vowed to myself to take plenty of time and not give away the victory. 31. Nc3 ... I see no immediate mating pattern. And if I'm not vigilant, White can easily swing his Queen down to a8 and check my King. I decide that a Queen exchange will reduce my hazards and simplify the game down to a Rook versus Knight battle. I felt that I should be able to promote my pawn that was currently on a5, particularly after the expected moves 31 ... Qd3+ 32. Qxd3 Rxd3 33. Ne1 Rxb3. 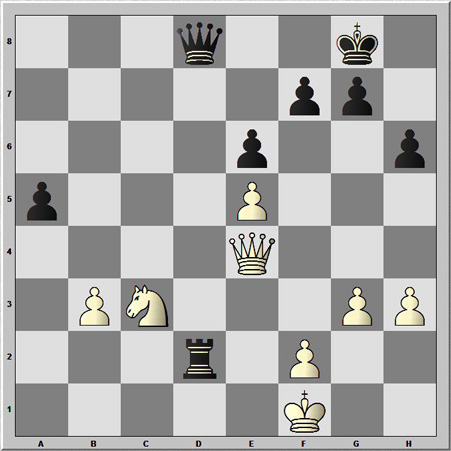 31. ... Qd3+ 32. Ke1?? ... White, in serious enough trouble as it is, blunders here. Exchanging the Queens was far better than 32. Ke1 which loses White his Queen. 32. ... Rd1+ 33. Nxd1 Qxe4+ 34. Ne3 Qb1+ 35. Nd1 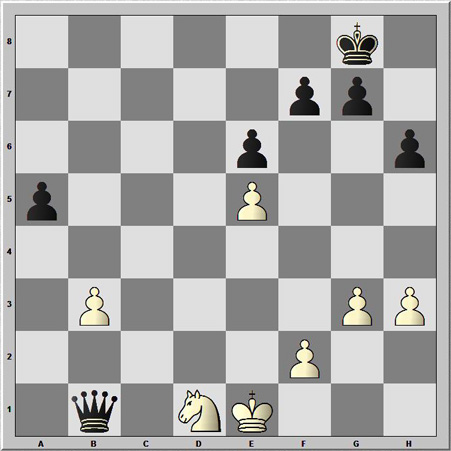 Before I could play 35 ... Qxb3, Peter saw the game was hopeless. White resigned. 0-1 The PGN for this chess game can be found: here. An image of the scoresheet for this chess game can be found: here . | ||
Contact Info
© 2015 Earl Richards. All rights reserved.